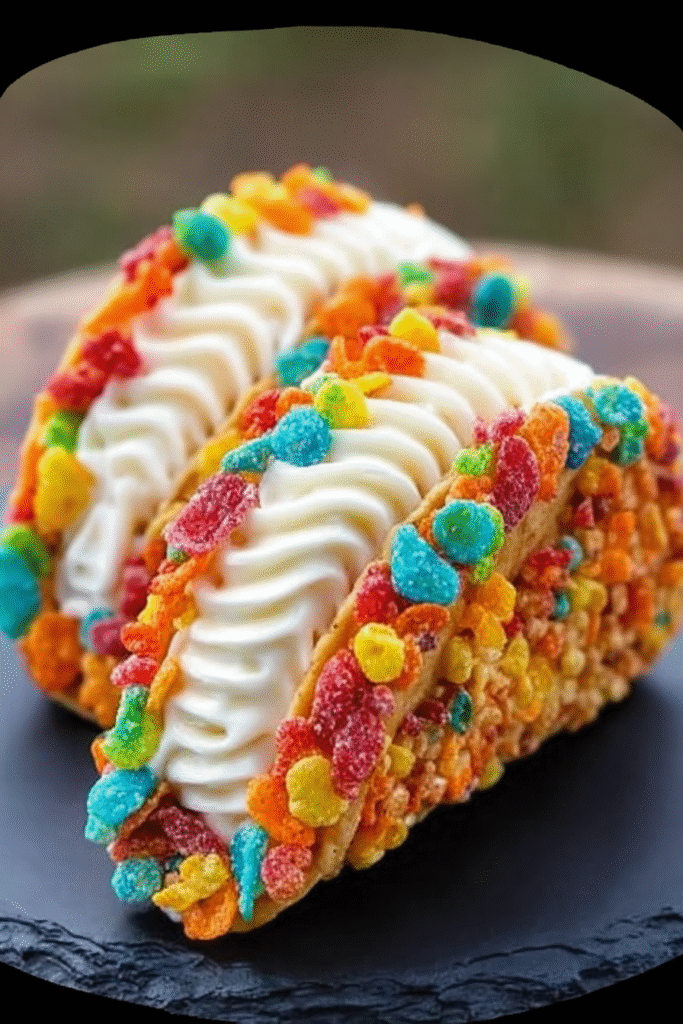
These Fruity Pebbles Cheesecake Tacos create a whimsical dessert by shaping colorful cereal and butter into crunchy taco shells filled with sweetened cream cheese mixture lightened with whipped cream for a playful twist on traditional cheesecake. The recipe builds texture through butter-bound cereal shells that firm when chilled, paired with smooth, creamy filling that contrasts perfectly. The technique uses simple pressing and folding methods requiring no baking. The result delivers fun, eye-catching individual desserts with crunchy-creamy contrast and vibrant colors perfect for parties, celebrations, or creative weeknight treats.
Why You’ll Love This Recipe
Whimsical Presentation – Taco-shaped dessert with bright colors creates conversation-starter appearance that delights all ages.
No-Bake Simplicity – Eliminates oven use; just press shells, chill, and fill for easy preparation.
Crunchy-Creamy Contrast – Crispy cereal shells paired with smooth cheesecake filling creates satisfying textural variety.
Kid-Friendly Fun – Colorful cereal and playful shape appeal to children while remaining enjoyable for adults.
Individual Portions – Pre-portioned servings eliminate cutting and provide built-in portion control.
Customizable Colors – Use any fruity cereal variety to match party themes or color preferences.
Ingredients You’ll Need
For the Shells:
- 3 cups fruity cereal (like Fruity Pebbles) – provides colorful, crunchy base and nostalgic flavor
- ½ cup unsalted butter, melted – binds cereal pieces together into moldable mixture
For the Filling:
- 8 oz cream cheese, softened to room temperature – creates rich, tangy cheesecake base
- ½ cup powdered sugar, sifted – sweetens filling without grainy texture
- 1 teaspoon pure vanilla extract – enhances overall sweetness and depth
- 1 cup whipped cream – lightens cream cheese mixture and adds airy texture
For Garnish:
- Additional fruity cereal – provides colorful topping and reinforces flavor theme
Step-by-Step Instructions
Make Cereal Mixture
In medium mixing bowl, combine 3 cups fruity cereal with ½ cup melted butter. Stir thoroughly using spoon or spatula until every cereal piece is evenly coated with butter, similar to making Rice Krispy treats.
Mold Shells
Press cereal mixture firmly into small taco-shaped molds or inverted muffin tin cups to create taco shell shapes. Use back of spoon or fingers to compact tightly, ensuring mixture holds together and forms sturdy shells. Make approximately 6 shells depending on mold size.
Chill Shells
Place molded shells in refrigerator for at least 30 minutes to allow butter to solidify and shells to firm completely. Proper chilling is essential for shells to hold shape when removed from molds.
Beat Cream Cheese
Using hand mixer on medium speed, beat softened cream cheese in large bowl for 2-3 minutes until light, fluffy, and completely smooth with no lumps remaining.
Add Sugar and Vanilla
Gradually add sifted powdered sugar to whipped cream cheese, beating on low speed initially to prevent sugar cloud. Add vanilla extract and continue beating until mixture is smooth and well combined, about 1-2 minutes.
Fold in Whipped Cream
Using rubber spatula, gently fold whipped cream into cream cheese mixture with sweeping motions. Fold carefully to maintain airy texture rather than deflating whipped cream through vigorous stirring. Continue until mixture is uniform and no streaks remain.
Remove Shells from Molds
Once cereal shells are completely firm (after minimum 30 minutes chilling), carefully remove from molds by gently pressing from bottom or sides. Shells should hold taco shape without breaking.
Fill Shells
Using spoon or piping bag, generously fill each cereal shell with cheesecake mixture. Mound filling slightly for attractive presentation and abundant creamy element.
Garnish and Serve
Sprinkle additional fruity cereal over filled shells for colorful garnish and textural accent. Serve immediately for softest shells, or chill filled tacos 15-20 minutes for firmer texture that’s easier to handle.
Recipe Notes & Tips
Butter Temperature – Use melted but not hot butter; extremely hot butter can cause cereal to become soggy rather than crispy.
Firm Pressing Critical – Compact cereal mixture tightly into molds; loose pressing creates fragile shells that break easily.
Room Temperature Cream Cheese – Completely softened cream cheese is essential for smooth, lump-free filling without overmixing.
Gentle Folding – Fold whipped cream carefully to maintain light, airy texture; aggressive mixing deflates air and creates dense filling.
Mold Alternatives – If taco molds unavailable, shape over inverted muffin tin cups or create freeform shapes on parchment paper.
Chilling Time Flexible – Shells can chill longer than 30 minutes; overnight refrigeration works well for advance preparation.
Nutritional Information
Prep Time: 20 minutes
Chilling Time: 30 minutes
Total Time: 50 minutes
Yield: 6 servings
Calories per serving: Approximately 380-420 kcal per taco (estimated based on ingredients)
Perfect Pairings
Cold Milk – Classic beverage pairing provides nostalgic complement to cereal-based dessert.
Fresh Fruit – Strawberries, blueberries, or kiwi add fresh element and balance sweetness.
Vanilla Ice Cream – Small scoop alongside taco creates complete dessert plate.
Sparkling Lemonade – Refreshing citrus beverage cuts through rich cream cheese filling.
Ideal Occasions
Children’s Birthday Parties – Colorful, fun presentation appeals to kids and creates memorable dessert experience.
Casual Gatherings – Individual servings make these perfect for potlucks or game day desserts.
Themed Celebrations – Adapt colors to match party themes using different cereal varieties.
Creative Weeknight Treats – Quick, no-bake preparation makes special dessert accessible on busy evenings.
Storage & Serving Tips
Immediate Serving Best – Shells maintain optimal crunch when served shortly after filling; prolonged contact with filling softens cereal.
Short-Term Refrigeration – Store filled tacos covered in refrigerator up to 2-3 hours; longer storage causes significant shell softening.
Separate Component Storage – Store unfilled shells in airtight container at room temperature and filling separately in refrigerator for best texture preservation.
Assembly Before Serving – For advance preparation, make shells and filling separately, then assemble just before serving time.
Creative Variations to Try
Different Cereal Flavors – Use Cocoa Pebbles, Trix, or Lucky Charms for varied colors and flavors.
Chocolate Filling – Add 2 tablespoons cocoa powder to cream cheese filling for chocolate cheesecake version.
Berry Topping – Top with fresh diced strawberries or berry compote for fruit accent.
Mini Cookie Shells – Replace cereal with crushed cookies (Oreos, graham crackers) for different base flavor.
Troubleshooting Common Issues
Shells Breaking – Not pressed firmly enough or insufficient chilling time; compact tightly and chill full 30 minutes minimum.
Lumpy Filling – Cream cheese too cold when mixing; ensure complete room temperature softening before beating.
Soggy Shells – Filled too far in advance; assemble close to serving time or store components separately.
Shells Won’t Hold Shape – Not enough butter or mixture too warm; ensure proper butter ratio and mold while mixture is cool.
Why This Recipe Works
These fruity cereal cheesecake tacos succeed because the melted butter coats cereal pieces and acts as edible adhesive that binds pieces together when cooled, similar to marshmallow in Rice Krispy treats but with richer flavor. The firm pressing into molds creates compact structure that holds taco shape after butter solidifies during refrigeration. The cream cheese filling mimics traditional cheesecake through sweetened, vanilla-enhanced cream cheese base, while folded whipped cream lightens dense cheese and creates mousse-like texture that pipes or spoons easily. The no-bake method relies on refrigeration rather than heat for setting, making preparation accessible without oven. The contrast between crunchy cereal shell and smooth, creamy filling creates satisfying textural variety in each bite. The colorful cereal provides visual appeal that makes these inherently fun and photogenic. At an estimated 380-420 calories per taco, this represents indulgent dessert portion with significant sugar and fat content from butter, cream cheese, and whipped cream, balanced by small serving size.
Final Thoughts
This recipe demonstrates how creative presentation—familiar dessert components in unexpected taco format—transforms simple ingredients into memorable, Instagram-worthy treats that generate excitement beyond their flavor. The no-bake preparation eliminates baking anxiety while the playful concept appeals to both children and adults seeking whimsical desserts. At approximately 380-420 calories per serving, this provides moderate-high indulgence appropriate for occasional treats rather than regular consumption, with most calories coming from butter and cream cheese. The individual portion format provides natural serving control and eliminates cutting complexity, making these practical for parties where guests serve themselves. The vibrant colors from fruity cereal make these particularly suited to children’s celebrations, themed parties, or any occasion where fun, colorful presentation enhances experience. For slightly lighter version, use reduced-fat cream cheese and substitute half the whipped cream with Greek yogurt to cut approximately 60-80 calories per taco while maintaining creamy texture. The component separation strategy—making shells and filling separately, then assembling before serving—allows advance preparation without quality compromise, though shells lose optimal crunch after several hours in contact with moist filling. This suits cooks seeking creative, conversation-starting desserts that balance novelty with familiar, crowd-pleasing flavors and require minimal technical skill or special equipment beyond basic molds.